Thoughts on 600-yard loads
April 20, 2021
Submitted by Danny Arnold, Team CMP
Before we get started, I want to stress that all of the information that follows is geared toward the .223/5.56 Service Rifle. That doesn’t mean that there’s nothing here for anyone else, but the .223/5.56 Service Rifle platform is where I’ve spent the majority of my time, so here we go.
There is only one “Perfect” 600–yard load for my rifle, True or False? This example is more anecdotal than scientific, but it provides some food for thought.
Team CMP spent the early part of March competing in the Orange Blossom Regional. As soon as we got on the range, Sara Rozanski (Team CMP member) started having problems with her 600-yard ammunition. Nearly 1/3 of her cases were exiting the chamber, minus the primers. I offered to swap my ammunition for hers, suspecting that my Wylde chamber would be more forgiving than her CLE chamber – a solution that seemed to solve the problem. At least neither of us was blowing primers!
Sara’s ammunition was a factory load using a well-known 80+ grain bullet with an unknown primer and powder, using brass from a respected manufacturer. My load was a different brand of 80-grain bullet, with my choice of powder and primer, all in brass made by someone else. Given the color of the primers, the only thing that our ammunition could possibly have had in common was the brand of powder…maybe. So, how did we shoot?
Sara and I shot the two-person team together and the entire 2,400 aggregate, although on different relays. Sara’s combined 600-yard score was 780-28X (97.5%). Mine was a 783-24X (97.87%). Our scores were never more than two points apart on any of the four days. Keep in mind that we were using each other’s ammunition the entire time.
So, we had different barrels, chambers and ammunition, but similar results. That goes back to the idea that a good load will perform similarly if fired in a good barrel.
Are we too focused on Ballistic Coefficients (BC)? The prevailing wisdom has always trended toward loading the highest BC bullet we could find and pushing it as fast as possible. Back in the early ‘90s when I got started with the AR-15, the 80-grain Sierra was state of the art. Actually, I picked up all of my Leg points with it, although today it looks a bit dated…kinda like me.
So, the question I’ll pose is this: Would you rather shoot a high-BC bullet that groups ¾ MOA (minute of angle) or a lower-BC bullet that groups into ½ MOA traveling 50 feet-per-second faster? The reason that I posed this question is a situation I found myself in a decade ago. Our coach decided that he wanted us to pair-fire some 600-yard for practice. Unfortunately, I hadn’t gotten the memo and all that I had available was my normal short-line ammunition, loaded with a 77-grain bullet. The shooter I was paired with was using a higher-BC bullet than I was, but in the end, we both shot 198’s.
Admittedly, using 77’s meant that coach had to work a little harder to keep us together on target, but it was a teaching moment for me. I knew that my upper shot 77’s better than the available bullets in the 80-grain range, so I cranked out a windage table for the 77-grain bullet at 600 yards and shot those for the rest of the season. After all, the wind blows ALLbullets around. It’s just a matter of knowing what YOUR bullet is doing.
With the shortages that we’re experiencing right now, a lighter bullet may be all that you have available for the 2021 season. That doesn’t mean that you’re disadvantaged though.
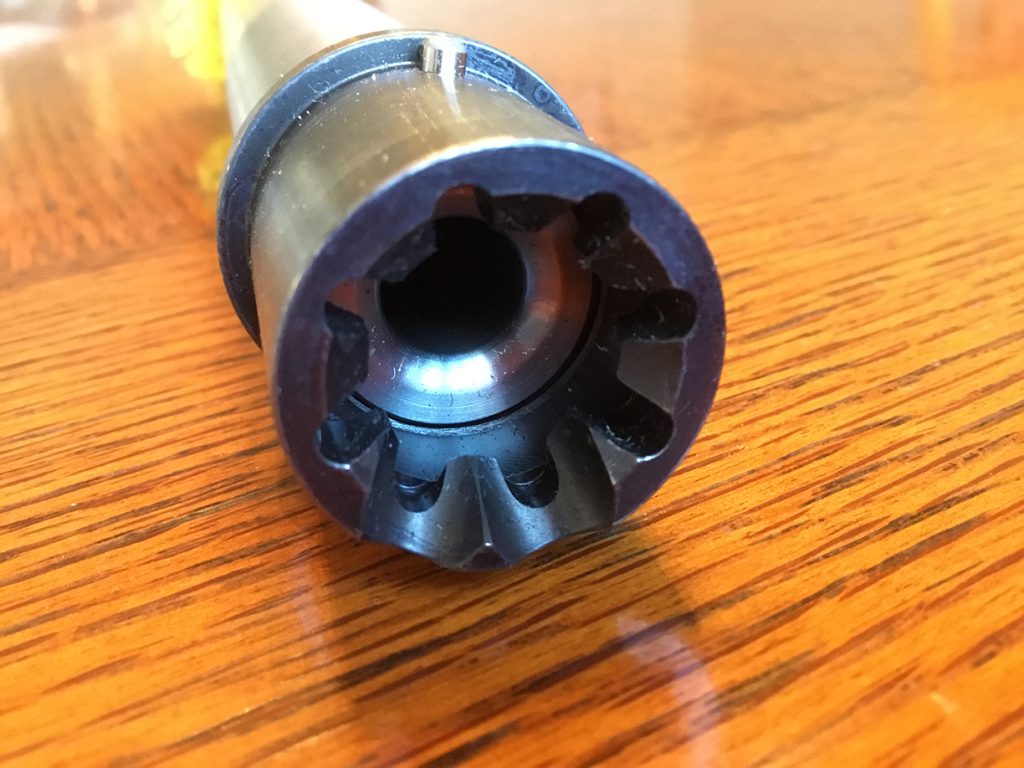
Loading High-BC Bullets. In the past decade, several bullets have appeared that weigh 80-grains or more. One thing that many of them have in common is a very sharp nose profile, whether metal or polymer. The question is: Are you using the right seating stem?
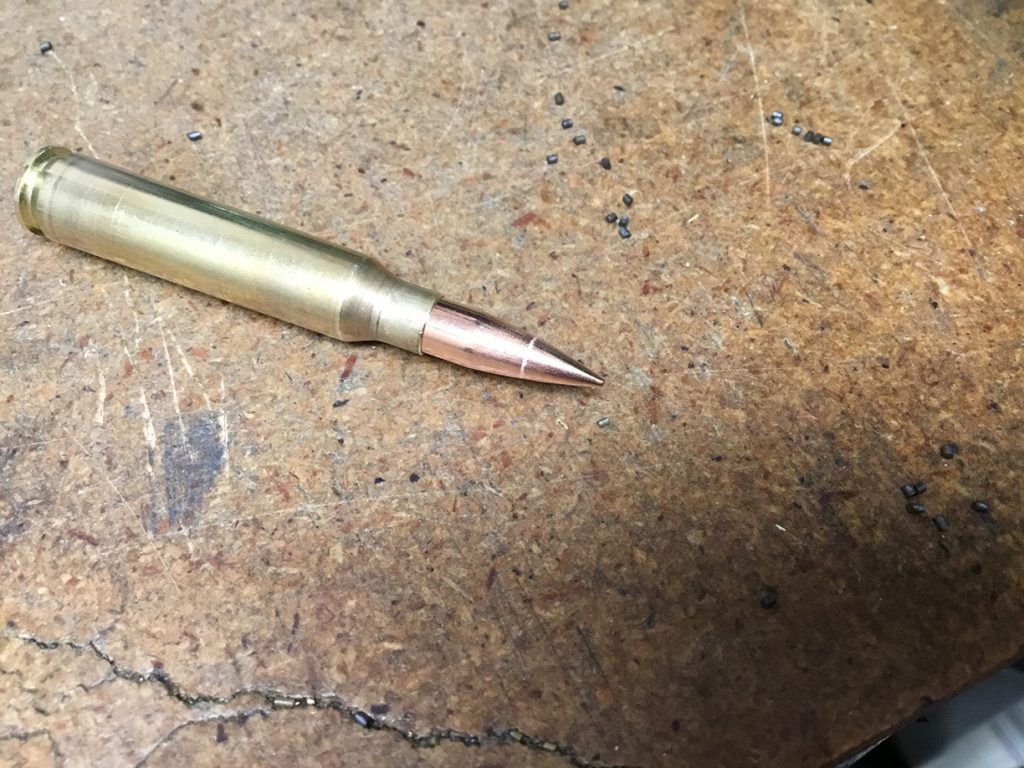
The jacket material in the bullet’s nose is very thin. If you section a bullet, you’ll find that there is a surprising amount of air space in the nose. If you’re using older seating dies, your seating stem may be contacting the bullet nose too close to the tip, where the jacket is the both thinnest and is unsupported by the lead core. This can manifest itself either as a deformation at the very tip of the bullet or as a circular dent around the bullet nose that you can see and feel with your thumbnail. I think we can all agree that denting a bullet is usually considered a bad thing.
One company goes so far as to recommend their proprietary seating stem for use with their high-BC bullets. Other companies leave it up to you to find a seating stem that will allow the bullet nose to go deeper into the seating stem, moving the contact point further down the bullet where the jacket is thicker and supported by the core material.
Seating depth. Some bullets don’t mind some “jump” into the lands, but some really do. Unfortunately, manufacturers don’t tell you much about that. Your chamber configuration (Wylde, CLE or some hybrid of the two) and the bullet that you choose will determine your optimal seating depth. Long and short of it, a quality measuring tool to determine seating depth is a necessity these days. Keep in mind that if you’re doing this with a brand new barrel, the throat is likely going to change slightly in the first 200 rounds and may need to be re-measured. Actually, since all of your short range ammunition has to be loaded to magazine length, you’re probably better off developing your short range loads before starting on long range load development. That gives the throat a chance to wear in a bit on a new barrel.
Brass prep. When match-grade AR15’s first arrived on the scene, it was amazing how little it took to get them to shoot well. Other than making sure that I had brass from the same lot and running it through a set of match-grade dies, I did nothing. Of course, we were also using a post front sight. Was the occasional bad shot me, the rifle, the load or just an archaic sighting system?
Transitioning to optics has caused me to reconsider how and what I do in my reloading process: That, and having some extra time on my hands to experiment.
A little (or a lot) of time spent with a neck turning tool, a primer pocket uniformer and a flash hole reamer will quickly show you how consistent brass is by manufacturer and even by individual lot. That exercise also makes the prices charged for high-quality brass seem ridiculously cheap. That doesn’t mean that I advocate neck-turning or other uniforming practices, nor do I advocate spending scandalous amounts of money on long-range brass. However, our sport is about consistency. The consistency of your brass is a matter of choice, whether you choose to simply segregate cases by weight (cheap option), neck turn (labor intensive) or open your wallet a little wider for premium brass.
To measure or weigh? For a long time, I used a powder measure to throw all of my 600-yard loads. The powder I was using metered well, and the results downrange didn’t justify the extra time spent with a scale. That was in the day of iron sights though. Nowadays, I’m throwing my charges and trickling up to the desired weight as measured on a scale that weighs to a 100th of a grain.
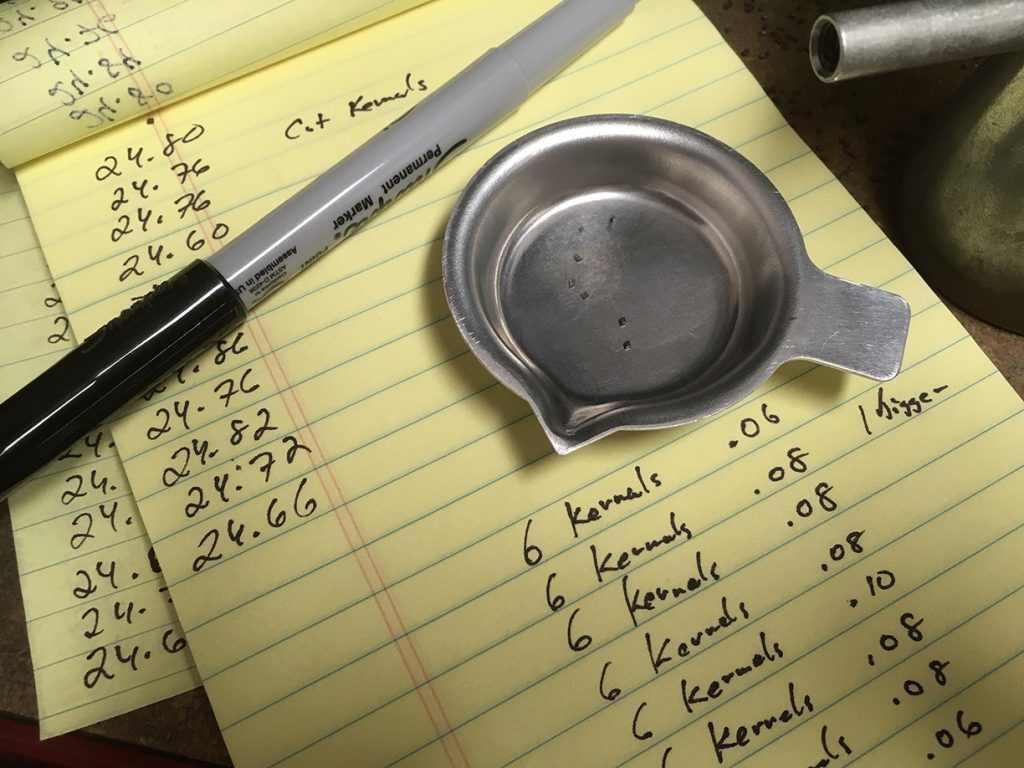
To quantify the difference between individually weighing each charge versus throwing charges with a powder measure, I weighed six kernels of powder that I trickled into the pan and then dumped them into the hopper. Going through that process 10 times, I came up with an average weight of .08 grains for six kernels. Next, I threw 50 charges for weighing using my powder measure. If I felt the measure hanging up as it cut kernels, I put the charge back into the hopper without weighing it.
Fifty smoothly thrown charges varied .26 grains from lowest to highest, with the majority varying no more than .16 grains from highest to lowest. If the desired weight was exactly in the middle, at worst you’d be .13 grains (9-10 kernels) low or high, with the majority being off no more than .08 grains (6 kernels) above or below the desired charge weight. Is that enough to send a shot outside the 2-MOA 10-Ring? Probably not.
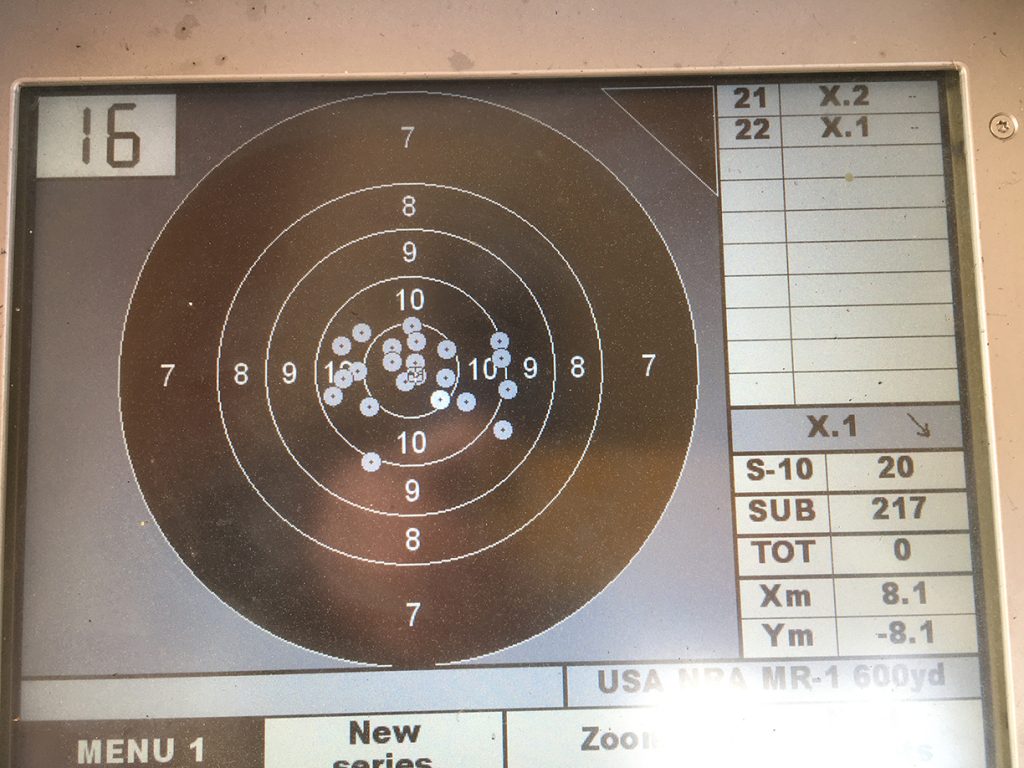
Has more consistent brass and weighing charges to a 100th of a grain added up to higher scores? Honestly, this question is hard to answer. Looking at the results on paper at 200 yards, using a powder that meters well combined with a consistent touch on the loading lever doesn’t appear measurably different than meticulously weighing each and every powder charge. Looking back over my 600-yard plots however, I can see a trend toward a group that is closer to X-ring height.
Since the bullseye is widest at the center, shooting groups that are the height of the X-ring gives you more room for error when the wind is blowing. That can translate into higher 600-yard scores.
How you load your ammunition vs. How you load your rifle.
The loading/chambering cycle of the AR-15 is, in a word…violent. You have a relatively heavy bolt and carrier assembly under power of a stout buffer spring slamming forward to chamber each round of ammunition. By design, those rounds were supposed to be held securely by the magazine feed lips until the bolt stripped them off the follower. Obviously, due to their overall length, 600-yard loads can’t be chambered that way. Although the barrel extension is funnel-shaped, it’s also got a lot of “teeth” ringing the inside of it. Whether you’re using a standard magazine or a single-round loading device (SLED), dropping a round in the loading port and releasing the bolt is an act of faith in that you’re trusting the bullet to arrive in the chamber undamaged.
How many times have you seen someone drop a round on the follower, press the bolt release and watch as the bolt jammed on a cockeyed round? If that happens once every 100 tries, how many times did the bolt close on a scratched, dented or misaligned bullet, and could that be the cause of the occasional errant shot?
My technique is to drop each round on top of the SLED and then push it slightly forward with my finger, partially chambering it before releasing the bolt. Admittedly, some people may be unable to do this due to body configuration or left-handedness, but why go to all the trouble of loading “perfect” ammunition and then damage it on the way into the chamber?
Now that we’ve covered bullets, brass and assorted errata we can move on to…
Load Development.
Finding a load for 600 yards is a lot like finding a load for short range. Once I decide on a bullet, powder, primer, velocity range and a measured guesstimate of seating depth, I load 10 rounds of each test load, increasing in .2 (2/10) grain increments and test them from the prone position at 200 yards. Ideally, I want to see two loads that are .2 (2/10) of a grain apart that shoot almost identical groups. The load that I choose will fall in between the two best shooting loads that I tested. If the first load is XX.2 grains and the second is XX.4grains, my chosen load will be XX.3 grains.
Why develop loads in .2-grain (tenths) increments if I have a scale that measures in .01-grain (hundredths) increments? Or, why not test in .1-grain increments?
For me, working in .2-grain increments gets me to the results quicker. Also, there is a difference between accuracy and consistency in this scenario. Developing loads in .2-grain increments gets me to an accurate load. Producing that load using a scale that accurately measures to .01-grain insures a consistent load, assuming that I do my part.
Once I’ve settled on a load, it’s time to play with seating depth, if I choose to. If I’m lucky and the groups are acceptable as-is, I won’t do anything. If I think there’s room for improvement, I’ll experiment a little. Depending on the bullet, changing the seating depth by a couple of thousandths one way or the other may change the group size. During this phase of testing, it’s a good idea to chamber a round and see if the entire round will then extract. If you leave a bullet stuck in the throat, your rounds are too long. Finding that out at a match can ruin an otherwise good day.
Another thing to keep in mind is that your barrel is not static. Every round fired has an effect on the throat, vaporizing and scouring away metal until the distance the bullet travels before meeting the rifling measurably increases. If you have chosen a bullet that shoots best when close to the lands, you’ll need to periodically re-measure and possibly change your bullet seating depth to maintain that optimal relationship.
The Elephant in the Room.
There’s really not a delicate way to put this, so I won’t try. There’s little point in spending time and effort developing a load that shoots into ½ MOA off the bench if you’re only capable of shooting 2 MOA using a sling right now.
That doesn’t mean that there’s no hope. On the contrary, it just means that your time and effort is better spent practicing with some good short range ammunition on reduced targets at a 100 or 200-yard range. At that distance, wind is not a factor and your technique can be improved more quickly so you’re in a position to benefit from that ½ MOA ammunition.
About Team CMP
CMP has created a Highpower Team with top competitors. Team CMP competes at several events throughout the year and most importantly, helps to teach Highpower Clinics at CMP Competition Events. Learn from Team CMP at Camp Perry during the Advanced Highpower Clinic. Visit https://thecmp.org/training-tech/advanced-cmp-highpower-clinic/ for more information.
Will seating depth affect POI as well as group size?
I was popping primers out of the case at the 600 yd line in my Compass Lake Eng AR -SR a few years back and I talked to Frank @ CLE.. Turns out there was a carbon ring that was spiking pressures. A 100 strokes with JB’s fixed it. This taught me to make sure the throat and the rifling just ahead of the chamber is cleaned with a good carbon solvent and a few JB strokes, every 250 rds, as per Frank Whites suggestion
I’ve seen the carbon ring phenomenon before, but I don’t really think that was the issue. What I didn’t relate in the article was that Sara’s ammunition was pretty hot in my rifle (Wylde chamber) too. In fact, there was a prominent smear on the case head where brass was flowing back into the ejector hole as the bolt was unlocking. The result looked a lot like a comet with its tail. I junked all of that brass after I got home.
I enjoy reading these style of articles. Thank you and well done.
Thank you for the considerable amount of thought and effort you put into the testing and reporting of your work. It certainly does give us much food for thought. The results you’ve reported and the questions you’ve raised show that, however much one experiments and documents, shooting is still as much an art as it is a science.
Great article!
Danny,very good write up on loading.
You showed a bullet that had a mark where the seating die made contact.
Is this mark known to cause accuracy issues or is it more cosmetic?I understand it depends on how much
damage to the jacket.At say 600 yards,how much could it destroy accuracy?
I am experiencing this same mark but it’s also on a compressed load.Is the pictured bullet also on a compressed load?This s what I believe causes this mark.The force on the bullet to compress the powder.
I also like the idea of the halfway between 0.2 grn work up.
Thank You
Randy,
You are correct, in that the picture is of one of my Palma loads, in which the powder is slightly compressed. The ring is an abrasion rather than a dent and is more visible on the Palma loads. My Service Rifle loads also have a slight abrasion mark as well but for photographic purposes I chose to use the Palma load since it was more visible.
I don’t believe that a shiny abrasion creates any problems, but a dent is another matter, particularly if the nose were to collapse unequally.
One trick that I use with compressed loads is to tap the case a couple times to settle the powder, seat the bullet down to where the base of the bullet touches the powder then do a tap roll where I drop the case on it’s side, pick it up & roll it then drop it again four or five times so that the powder settles around the boat tail then finish seating the bullet. With that process, I can feel the difference as well as eliminating or reducing the ring from the seating stem. I also noticed that compressed loads may not seat as deeply or not as consistently as the powder will actually push the bullet back out.
If you are shooting 2 MOA using a sling and you have 1/2 MOA ammunition your statistical group size will be 2 1/2 MOA. If you are shooting 2 MOA ammunition your group size will be 4 MOA. Always shoot good ammunition. Loading well no more difficult than loading poorly.
If you drop a water ball at the water hazard you are almost certain to put it in the water.
I agree. You need to practice with accurate ammunition so you know if a poor shot was human error. But I feel the main point he was trying to make is especially when you start out your time is better spent practicing on the line than trying to squeeze the last 1/4 moa out of a load. I personally have several different loads. One I do all the voodoo with all the neck turning weight sorting and trickling powder down to the last .01 while under a full moon. This is what I use for competition. For practice I throw powder and about the only uniforming checks are to make sure the brass is all the same year. At my level I do a little better with the OCD ammo but it is not drastically better. This way I can get a lot of practice and cut down on time spent at the bench.
I agree with Anthony as well as you Bruce.
The point I was attempting to make, and which you caught on to was that some shooters, particularly new ones expend a tremendous amount of time chasing down the “perfect” load / bullet instead of working on fundamentals.
To look at it another way, 1/2 MOA ammunition and a 2 MOA hold gives you 2-1/2 MOA groups if the wind isn’t factored in. A 1/2 MOA hold and 1 MOA ammunition gives you a 1-1/2 MOA group.
A good hold is something that will stay with you for your entire shooting career. Loads, on the other hand, have the potential to change every time we switch barrels.
It’s not hard to make good ammunition, but it’s only part of the total equation.